

Mounting SMB/CIFS Network Share Guide (macOS & Linux)
This document provides step-by-step instructions for connecting to the Department network storage server on both macOS and Linux operating systems using Graphical User Interfaces (GUI) and Command Line Interfaces (CLI). Any problems email Duncan @djh35.
Connection Details
|
Parameter |
Value |
|---|---|
|
Server Name / Host |
nmr-recent.ch.private.cam.ac.uk |
|
Server URI (macOS / Linux GUI) |
smb://nmr-recent.ch.private.cam.ac.uk |
|
Active Directory Domain |
AD |
|
Example Username |
js123 |
|
Full Domain Username |
AD\js123 or js123@ad.cam.ac.uk |
Note regarding out of department access: To connect from outside the department network, you must first establish a connection to the departmental VPN. Go the Computer Officers IT pages for instructions - link on previous page.
Note regarding active directory passwords: Please go to the Computer Officers IT pages for instructions about how to retrieve your password.
MacOS Instructions
Option 1: Graphical User Interface (Finder GUI)
Temporary / One-Time Mount
- Open Finder.
- From the top menu bar, click Go → Connect to Server... (or press Cmd + K ).
- In the Server Address field, enter:
- smb://nmr-recent.ch.private.cam.ac.uk
-
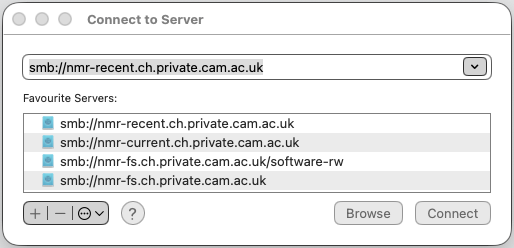
(Any previously saved network locations will also be shown)
-
Click Connect.
- When prompted for credentials:
- Select Registered User.
- Name: AD\js123 (or js123)
- Password: Your Active Directory password
- (Optional) Check Remember this password in my keychain if you wish to save credentials.
- Click Connect. Select the volume/share you wish to mount. The drive will appear on your Desktop and under Locations in Finder.
Auto-Mount at Login
- Open System Settings (or System Preferences on older macOS versions).
- Go to General → Login Items (or Users & Groups → Login Items).
- Drag the mounted network drive icon from Finder into the Open at Login list.
Option 2: Command Line Interface (macOS Terminal)
Step 1: Open a Terminal
Open Terminal (/Applications/Utilities/Terminal.app) and type in the following line.
open 'smb://js123@nmr-recent.ch.private.cam.ac.uk'
Step 2: Enter your password into the dialogue box
Enter your Active Directory password into the dialogue box.
🐧 Linux Instructions
Prerequisites (CLI)
Before mounting via CLI on Linux, ensure the CIFS utilities package is installed.
Ubuntu / Debian / Linux Mint:
sudo apt update
sudo apt install -y cifs-utils smbclient
Fedora / RHEL / CentOS / Rocky Linux:
sudo dnf install -y cifs-utils samba-client
Arch Linux:
sudo pacman -S --needed cifs-utils smbclient
Option 1: Graphical User Interface (Linux GUI)
GNOME Files (Nautilus)
- Open Files.
- In the sidebar, click + Other Locations.
- At the bottom, locate Connect to Server.
- Enter the address:
- smb://nmr-recent.ch.private.cam.ac.uk/share_name
- Click Connect.
- In the authentication prompt:
- Select Registered User
- Username: js123
- Domain: AD
- Password: Your Active Directory password
- Select your password retention preference (Forget immediately, Remember until you logout, or Remember forever).
- Click Connect. To bookmark the share, right-click the mounted share in the sidebar and select Add Bookmark.
KDE Dolphin
- Open Dolphin.
- Click Network in the Places panel, or click the address bar and enter:
- smb://AD;js123@nmr-recent.ch.private.cam.ac.uk/share_name
- Press Enter and enter your Active Directory password when prompted.
Option 2: Command Line Interface (Linux CLI)
Step 1: Temporary Manual Mount (mount -t cifs)
-
Create a local mount directory:
-
sudo mkdir -p /mnt/nmr_recent
-
Mount the remote share:
-
sudo mount -t cifs //nmr-recent.ch.private.cam.ac.uk/NMRrecent /mnt/nmr_recent -o username=js123,domain=AD,uid=$(id -u),gid=$(id -g),iocharset=utf8
-
You will be prompted for your local sudo password, followed by your Active Directory password.
-
Unmount when finished:
-
sudo umount /mnt/nmr_recent
Step 2: Persistent Auto-Mount on Boot (/etc/fstab)
**Warning**: only attempt the below if you understand the instructions and accept that you may render your system un-bootable if you make a mistake. Note, you are also saving a password in a plain text file. If your system is compromised, this is an additional risk.
To automatically mount the SMB share on system startup without storing credentials in plain text in /etc/fstab:
-
Create a secure credentials file:
-
sudo mkdir -p /etc/wincredentials
-
sudo nano /etc/wincredentials/nmr-recent.cred
-
Add your credentials into the file:
-
username=js123
-
password="YOUR_AD_PASSWORD"
-
domain=AD
-
(Save and exit nano with Ctrl+O, Enter, Ctrl+X)
-
Secure the credentials file permissions (Read/Write for user and root only):
-
sudo chmod 600 /etc/wincredentials/nmr-recent.cred
-
Edit /etc/fstab:
-
sudo nano /etc/fstab
-
Append the following line at the end of the file:
-
//nmr-recent.ch.private.cam.ac.uk/NMRrecent /mnt/nmr_recent cifs credentials=/etc/wincredentials/nmr-recent.cred,uid=1000,gid=1000,iocharset=utf8,x-systemd.automount,_netdev,nofail 0 0
-
Note: Replace uid=1000,gid=1000 with your actual user UID and GID if different (verify using id -u and id -g).
-
Test the configuration:
-
sudo mount -a
If no errors are displayed, check if the files are visible at /mnt/nmr_recent.
🛠️ Troubleshooting & Tips
|
Issue |
Cause |
Solution |
|---|---|---|
|
Permission Denied |
Incorrect credentials or domain format |
Ensure domain is set to AD. Use format AD\js123 |
|
Host Unreachable |
Not connected to departmental network |
Verify local network connection or connect via Chemistry VPN if off-site. |
|
Mount hangs on boot (Linux) |
Network interface not ready |
Ensure _netdev and x-systemd.automount options are included in /etc/fstab. |
|
Files read-only on server |
This is expected behaviour |
Copy files to local directory and change permissions if required. |
|
SMB Dialect mismatch |
Legacy server requirements |
Append ,vers=3.0 or ,vers=2.1 to the mount options. |
